1 days ago
Topic:
Satin Beads
izšuvums.lvPosts: 34
|
Agree. When stitch directions in Satin Path are placed right at the edge, it often happens that during stitch generation these stitch directions are ignored. You have to move the stitch direction away from the edge so that the stitches generate as intended.
The most frustrating part is that when opening older designs, you often don't notice that the stitch direction was altered for this reason, even though the guide lines are positioned exactly as planned!
|
|
|
3 days ago
Topic:
Script Errors for PulseCloud on New Computer
Tajima SoftwareAdministrator Posts: 589
|
@CrazyFrog it appears there was some maintenance being done on PulseCloud which is the reason for the error. Please try again.
|
|
|
3 days ago
Topic:
Satin Beads
Tajima SoftwareAdministrator Posts: 589
|
Hi Keith, thank you for the report. We're investigating this issue.
|
|
|
3 days ago
Topic:
Satin Beads
keith@wsemerson.comPosts: 27
|
Please explain why I cannot get stitches to follow beads... Happening a lot with the new release.
|
|
|
4 days ago
Topic:
Script Errors for PulseCloud on New Computer
CrazyFrogPosts: 8
|
Thank you for your Reply .... I have done that numerous times & tried it again just now & it won't work under
the Username CrazyFrog or CrazyFrogEmbroidery as below ...


|
|
|
4 days ago
Topic:
Alignment
wtePosts: 17
|
Update on the alignment - I couldn't get it to work for three days. Today, it seems to be working ....🤦♀️
|
|
|
4 days ago
Topic:
Alignment
wtePosts: 17
|
If I create a file with some font choices for a customer, and I try to align them by choosing the numbers, or the words I have on screen, the alignment feature doesn't become active.
|
|
|
4 days ago
Topic:
Alignment
izšuvums.lvPosts: 34
|
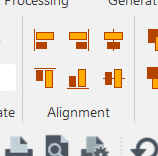
What do you mean alignment is not working? On the ribbon interface, the alignment feature is located at the top.
You need to select two or more objects, and the alignment feature will be activated.
wte wrote:
Hi -
First of all, thank you for fixing the stitch highlighting.
When I try and align numbers or words, the alignment feature does not work. I used to be able to do it. Is there somewhere else where I can access this feature?
Thank you.
edited by izšuvums.lv on 10/21/2026
|
|
|
4 days ago
Topic:
Script Errors for PulseCloud on New Computer
izšuvums.lvPosts: 34
|
CrazyFrog wrote:
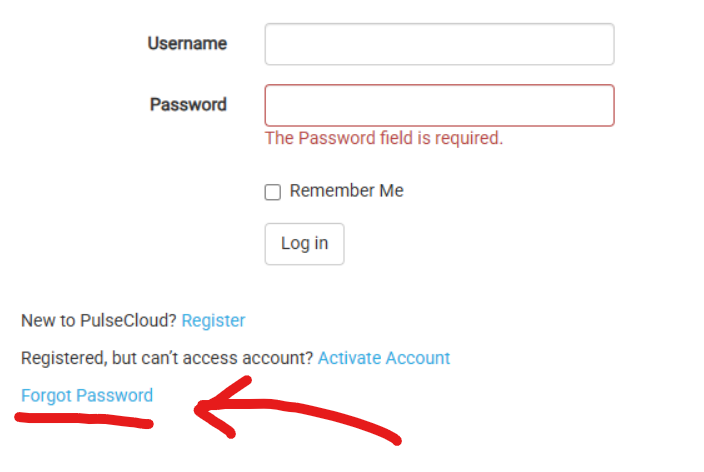
Thank you for your Reply ... I can't see a Reset Password button at the bottom of the page of the PulseCloud Login ??
Also I don't know if i'm supposed to be under CrazyFrog or CrazyFrogEmbroidery ....
I look forward to your reply ...
|
|
|
5 days ago
Topic:
Alignment
wtePosts: 17
|
Hi -
First of all, thank you for fixing the stitch highlighting.
When I try and align numbers or words, the alignment feature does not work. I used to be able to do it. Is there somewhere else where I can access this feature?
Thank you.
|
|
|
5 days ago
Topic:
Script Errors for PulseCloud on New Computer
CrazyFrogPosts: 8
|
Thank you for your Reply ... I can't see a Reset Password button at the bottom of the page of the PulseCloud Login ??
Also I don't know if i'm supposed to be under CrazyFrog or CrazyFrogEmbroidery ....
I look forward to your reply ...

|
|
|
5 days ago
Topic:
Script Errors for PulseCloud on New Computer
Tajima SoftwareAdministrator Posts: 589
|
Hi CrazyFrog. Please try resetting your password using the Reset Password button at the bottom of the PulseCloud login page.
Let us know if that helps you get back in.
|
|
|
6 days ago
Topic:
Script Errors for PulseCloud on New Computer
CrazyFrogPosts: 8
|
Hiya Guys, for some unknown reason Pulse Cloud has signed me out & I can’t get back in ?? This has happened to me before Approx 2yrs ago …
I also can’t remember if I am under CrazyFrog or CrazyFrogEmbroidery …
Some help would be much appreciated … I look forward to your Reply …
Thank you & have a Great day …
|
|
|
9 days ago
Topic:
Vector art disapearing
Tajima SoftwareAdministrator Posts: 589
|
Hi Fancystitchz. To keep your vector artwork visible, try enabling outlines by pressing Shift + X or clicking the green heart outline icon in the top toolbar.
If this doesn’t resolve the issue, could you please let us know what steps you took to import the vector artwork and which file format you’re using?
It would also be helpful to know which version of DG you’re running. To find this information, click Help in the top ribbon, then select About. Your version number will appear at the top of the window and should look something like 16.5.5.7683.
|
|
|
10 days ago
Topic:
Vector art disapearing
fancystitchzPosts: 3
|
Once I bring my Vector art in unless I put a bounding box around it, it fades out. Do I need to have something turned on to avoid this?
|
|
|
11 days ago
Topic:
Feature request: modern Save/Open dialog in DG 17
Tajima SoftwareAdministrator Posts: 589
|
Thank you for the request @MDM GWI we will evaluate for a future maintenance release.
|
|
|
11 days ago
Topic:
Feature request: Distribute objects evenly using t
Tajima SoftwareAdministrator Posts: 589
|
Thank you for the request @MDM GWI we will evaluate for a future release.
|
|
|
11 days ago
Topic:
Feature request: Distribute objects evenly using t
LuebbersPosts: 25
|
This is a great request, and I have made one similar for DG16, which never happened. If I may add to your request, it would be nice to also be able to group objects without combining them, and to be able to have multiple groups, and even group several groups into one group while retaining the groups within and be able to distribute those groups. All of this is possible in CorelDraw. (perhaps Illustrator too, I'm not sure)
It sure helps speed up the layout process.
|
|
|
12 days ago
Topic:
DG17.5 Release 8445 Now Available
Tajima SoftwareAdministrator Posts: 589
|
Tajima DG17.5 is Here!
DG17.5 is a major new version of Tajima DG17, packed with time-saving features plus speed and stability improvements. DG17 users can install it today from the PulseCloud download page:
https://cloud.tajimasoftware.com/Download
Top new features in DG17.5:
- Direct Import of PDF-Compatible Adobe Illustrator (.AI) Files
- Create Offsets as Any Segment Type
- Improved Stitch Quality for Mitered Corners, Columns & Boundaries
- Right-click to apply a preset
For the complete list of changes, see the DG17.5 Change List
A Note on Reforming the Context (Right-click) Menu:
As part of a continuing process of optimizing the design editing process, functions have been removed from the context menu. You will now find these tools and functions in their dedicated areas on the ribbon. If the ribbon is turned off, these tools will move back to the context menu.
|
|
|
14 days ago
Topic:
Feature request: Distribute objects evenly using t
MDM GWIPosts: 3
|
We’d like to request a Distribute tool for spacing objects evenly in DG 17.
Current behavior
When we place 3 or more objects (names, numbers, logos, repeated designs), we have to space each one by hand. It’s slow, and the spacing is rarely perfect.
Requested change
Add a Distribute command that works when 3 or more objects are selected:
The user picks a direction: Left to Right (horizontal) or Top to Bottom (vertical). DG 17 sorts the selected objects by position in that direction. It measures the gap between the first and second object. It places every object after the second at that same gap, one after another. This lets us set the spacing once, using the first two objects, and have the rest follow it exactly.
Nice to have
A choice between edge to edge spacing and center to center spacing The standard distribute mode as well, where the first and last objects stay in place and the space between is divided evenly A numeric field for typing an exact gap Why it matters
This saves real time on layouts with repeated elements and keeps every design consistent and organized. It would make working in DG 17 much more pleasant.
Thank you for considering this.
M.D.M.
GENERAL WEAR INC.
hello@generalwearinc.com
edited by MDM GWI on 10/11/2026
|
|
|